
I'm pleased to share with you today my take on how to make a quilted sewing machine cover.

First we need to measure the sewing machine.
Measure across the front of the machine, including the fly wheel on the side, this is going to be called the Machine Width.
Measure across the machine from front to back, this is going to be called the Machine Depth.
Measure the machine height, from the table, to the top of any knobs or raised parts on the top. This will be called the Machine Height.
Using these measurements you can calculate the sizes of the pieces you require.
I am allowing a generoous half inch for seam allowances.
For the front and back pieces;
(machine width measurement + seam allowances) x (machine height measurement + seam allowance)
mine was (16" + 1") x (13" + 0.5")
therefore my pieces will measure 17" wide x 13.5" high.
For the side pieces;
(machine depth measurement + seam allowances) x (machine height measurement + seam allowance)
mine was (7" + 1") x (13" + 0.5")
therefore my pieces will measure 8" wide x 13.5" high.
For the top piece;
(machine width measurement + seam allowances) x (machine depth measurement + seam allowances)
mine was (16" + 1") x (7" + 1")
therefore my piece will measure 17" high x 8" wide.
If you would like to add a pocket to one or both of your end sections;
I decided to use a square piece of fabric the width of the side panel, so 8"x8"
Because we are making a quilted cover you will need to cut an outer fabric piece, a wadding piece and an inner lining piece for each of your top, sides, front, back and pocket sections.
The sizes you have calculated above represent the size of the finished piece you will require AFTER quilting. As the act of quilting can reduce the measurements of the fabric slightly by pulling the fabric down and into the wadding, I cut my pieces slightly larger than needed and trimmed them down after quilting.
If you have a handle on the top of your machine and would like to make a handle hole you need to measure the length and width of your handle, mine was approx 6" long x 1.25" wide.
You may also need to measure the position of your handle - mine is slightly off centre.
The handle hole will be larger than the measurement you just took but we will work this out later.
You can go ahead and draw a diagram with all your measurements on if this is helpful.
You will need;
For my machine I used approx:-
- just under 1 FQ for the front panel - Sewing Machines print
- just under half a yard for the sides x2, pocket x1 and back - Keep Calm print. My print is directional, so I had some wastage after cutting, you may use less if you use a non directional print.
- a piece of fabric for the top
- about 1 yard of fabric for the inner lining
- about 1 yard of wadding
- fabric for binding the top of the pocket panel and the bottom of the cover
- a piece of fabric for the facing piece for the handle hole, I used plain white, the size of this piece will be determined by you later.
For each cover piece you need to layer as follows:
Inner lining fabric, right side facing down
Wadding on top of this
outer fabric piece, right side facing up.

Baste these three layers together, I used pins but you can spray if you prefer. Then quilt as desired, once quilted, remove pins and trim to your measurement as calculated above.
If you are making a pocket at one or both ends you need to layer, baste, quilt and trim your pocket square to size and then attach binding to the top edge. There are many great tutorials online for making and attaching binding, I use these links at Jaybird Quilts.


Now using a half inch seam allowance attach one piece to the other as directed in the photo below.

I recommend backstitching and oversewing when you go over the binding to make it nice and secure.
Continue layering, basting, quilting and trimming to size all your pieces - front, back, top and 2 sides until you have a lovely pile like this.

Now we are going to make the opening for the handle hole.
I measured the position of my handle and pinned out the rectangle shape according to where I thought it should go, I then laid my top piece over the machine and the handle and adjusted my pinning until I had it in just the right place. I then, very carefully, using my fabric shears, cut a slit in the middle of my pinned rectangle shape, see below.

If you are having trouble balancing your top piece over your machine and pinning at the same time, you can always attach your front and back pieces to the top piece, shown below, so that the cover will drape over the top of the machine and almost support itself.
To attach the top piece and the front piece;
Lay the top piece on the table right side facing up, lay the front piece on top of it, right side facing down. Align what will be your top edge and stitch using a half inch seam allowance. Open out, now lay the top piece back on the table with the right side facing up and now lay the back piece on top of it with right side facing down, align what will be your other top edge and attach with a half inch seam allowance. Open out, and you should now have something that looks like the picture below.

Now back to our handle hole. I gradually snipped away at my hole until I was happy it was in the right position and was big enough to maneuvre the handle through easily. It turned out bigger than the measurement I originally took and that's fine.

Here's a more close up picture.

Now take your fabric to be used as the handle facing piece, I made mine quite a bit larger than my handle hole so that I had some fabric to hold on to. Pin in place over the handle hole.
Using a quilting pencil or chalk we are going to draw on the shape of your handle hole, but slightly larger. Feel for the edge of your hole through the fabric and then mark your line a quarter inch bigger, or to the outside of the hole, so that when we sew along this drawn line you will be sewing through all your layers of fabric, a quarter inch from the edges of the hole.

Now topstitch all the way around your drawn rectangle and remove the pins.
Now draw a triangle shape at each end of the rectangle as below, and then join the points of the triangles with a straight line.

Using shears or scissors cut along these lines you just drew.

Taking one side of the facing fabric at a time, fold the fabric tightly through the hole to the underside and pin in place.

Your outer top piece should now look like the picture below.

Topstitch all the way around your handle hole, quite close to the edge to hold the facing fabric in place. I topstitched around twice, see below.

Remove your pins from the underside and trim back any excess fabric.

Now for the final assembly.
If you haven't already joined your top, front and back pieces as mentioned above, you can do this now.
Looking at your top piece, mark the middle of the left hand side short edge with a pin.
Now grab your left hand side piece and mark the middle of the top edge with a pin too. You can see my pins in the top of the picture below.

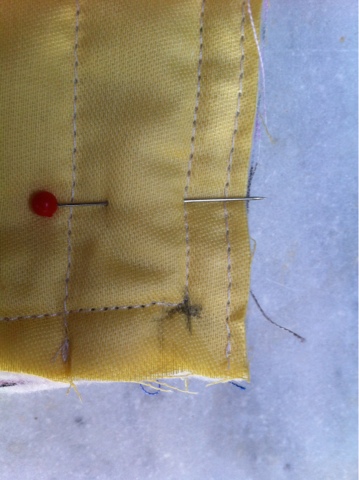
When we sew the sides on we will be starting at one bottom edge, going over the top and then back down the other side all in one go, so firstly mark with a quilting pencil or chalk a + where the corner intersection of your sewing will be, so half and inch from the top and half an inch from the side edge. See the picture below.
Lay your back piece on the table, right side facing up.
Lay your left side piece on top, right side facing down, alinging along the right hand edge and pin in place.
Start sewing up from what will be the bottom of your cover, using a half inch seam allowance.
Stop sewing with the needle in the down position when you get to your + mark, lift your machine foot and wiggle your cover around so that you can now sew across the top edge. Make sure your pins marking the middle of each piece line up, see below.

Lower your machine foot and sew along to your next + mark, then stop.

Again with the needle in the down position, lift your machine foot, wiggle the cover around, lower the machine foot and continue sewing down to the bottom edge of the cover.
You have now attached one side!
Repeat this process for your right side piece.
You should now have a completely pieced cover! You can trim away any fabric excesses in the corners to avoid bulk, be careful not to cut too close to your stitching.

Now turn your sewing machine cover out the right way, pressing your finger in the corners to push them out as neatly and as far as they will go.
Lastly you will attach binding to the raw bottom edge of the sewing machine cover. You can use the links for binding tutorials as mentioned above. I machine stitch the binding to the front and then fold the binding over to the back and handstitch in place.

Voila! A gorgeous Sewing Machine Cover! Well Done!

Please do not hesitate to ask me if you have any questions, and if you make a cover please add pictures to the Flikr group for me to see!
Happy sewing!
Linking up to the parties here.
22 comments:
No stopping you now!! xxx
Very clever and cute, not to mention useful!
Great tutorial, Karen! I love your sewing machine cover and the fabrics were perfect for the project. Thank you for sharing!
Lorna:)
http://sewfreshquilts.blogspot.com
Wonderful tutorial and what fun fabrics! Thanks for sharing.
Freemotion by the River Linky Party Tuesday
Great tutorial, and i still love these fabrics :o)
Great tutorial, and that fabric! Who is the designer/where did you get it?
Hi Wendy
You are a no reply blogger so I'm sorry I couldn't reply to you personally.
I'm in the UK, I got the pop art sewing machines print from frumble.co.uk and the Keep Calm print from patch fabrics.co.uk
They are both Timeless Treasures prints.
I hope you are able to get some!
Kind regards
Karen xx
I love the cover! Your tutorial makes me think - wow, I can do this! With 2 machines, I can use lots of my favorite fabrics. Thanks so much!
I found it and now it's on my quilt bucket list to make. YAY \o/ thanks for sharing!!
I made one today... it's on my blog http://dixielandcrafts.blogspot.com/2013/07/sewing-machine-cover.html
Very awesome and easy to follow tutorial!!!
Thanks for sharing! Very creative. Fabric is great.
I made this today - my first thing I ever sewed on a machine, and it turned out great. Thanks for the clever idea!
Sewing Machine Reviews
Thanks for the great tutorial, I am still learning here.
Well thanks for posting such an outstanding idea. I like this blog & I like the topic and thinking of making it right Term Paper Writing Help
That's really good article. Best Sewing Machine for Beginners
An interesting discussion is worth comment. I think that you should write more on Best Sewing Machines, it might not be a taboo subject but generally people are not enough to speak on such topics. To the next. Cheers
Best Sewing Machine for Beginners
This is some amazing tips on sewing machine, thank you for sharing Best sewing machines for beginners 2018
I am new to this site.This is an extremely educational article.I am trusting a similar best work from you later on as well.I am appreciative to you for offering this amazing article to this supportive learning. pikdo
I see Dead Trigger 1 Download PC this is very
Hungry Shark World Hack Cheat Unlimited Coins Gemsimportant and best portable jump starter 2020 very informative 8 ball pool mod apk 3.8.6 unlimited money
This is such a clear and informative tutorial, thank you! A rare treasure! ^_^
I want to share with you all here on how I get my loan from Mr Benjamin who help me with loan of 400,000.00 Euro to improve my business, It was easy and swift when i apply for the loan when things was getting rough with my business Mr Benjamin grant me loan without delay. here is Mr Benjamin email/whatsapp contact: +1 989-394-3740, lfdsloans@outlook.com / lfdsloans@lemeridianfds.com.
Post a Comment